When a paint film shows specks, loses gloss or drifts in color between batches, the cause of the pigment dispersion defects usually lies in one of four steps: wetting, milling, particle stabilization and dispersant. The five common defects are specks on the film, low gloss, color mismatch, floating, and settling or viscosity increase. Plants should measure fineness right after milling, run a rub-out test on the wet film and track paste viscosity during storage.
What is pigment dispersion and how do dispersion defects affect paint
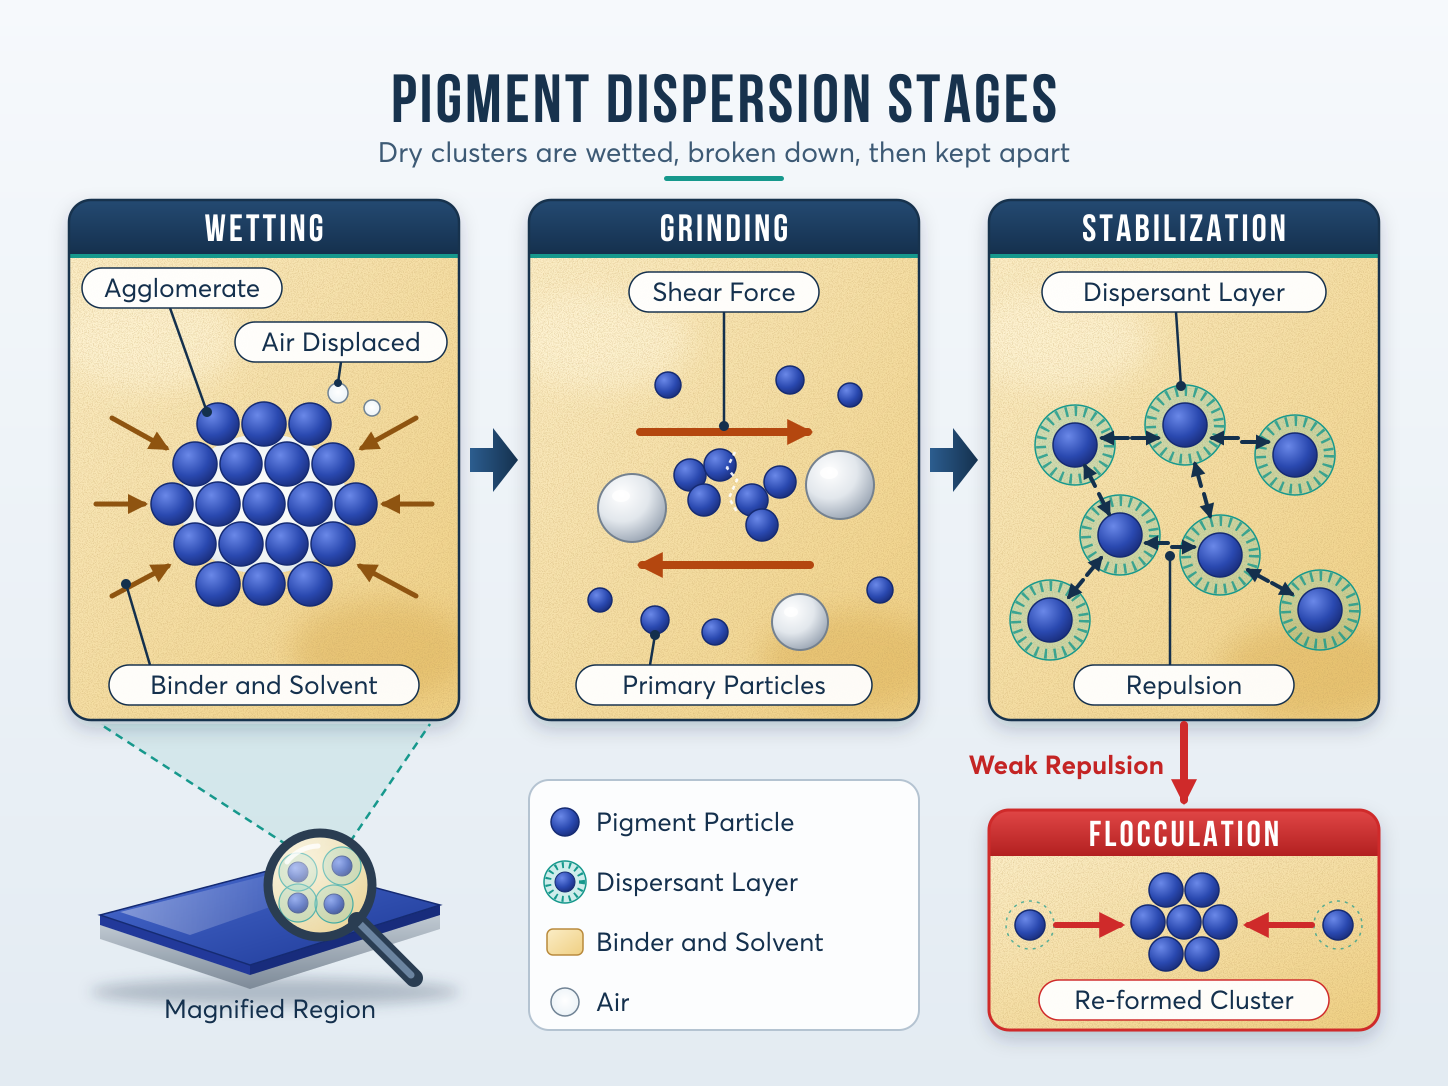
Pigment dispersion is the process of bringing dry pigment, which exists as clumps of particles stuck together, to a state where the particles are evenly distributed in the binder and solvent. It has three consecutive stages, and a fault in any stage leaves its own mark on the paint film.
Wetting: binder and solvent displace air on the particle surface and in the gaps between particles. Particles that are not wetted cannot be separated by milling force.
Milling: shear force breaks up agglomerates, which are clusters of primary particles held loosely together by weak attractive forces, into smaller particles.
Stabilization: the dispersant adsorbs onto the particle surface and creates a repulsive force that keeps particles from sticking together again. When repulsion is weak, the separated particles flocculate, meaning clusters re-form in the liquid paint or while the film is drying.
Particles that are not separated enough, or that re-agglomerate, reduce color strength, because large clusters absorb and scatter light less efficiently than single particles. The film loses gloss because clusters roughen the surface, hiding power changes, and two batches of the same formula give mismatched colors when the degree of particle separation differs. On lines running several batches a day, this drift usually shows up during color adjustment or when two paint lots are placed side by side. A view from production practice is in the article poorly dispersed pigment in industrial paint and how to fix it.
4 causes of 5 pigment dispersion defects
The five defects trace back to four causes. Each cause has its own signs and test, so the plant can rule them out one by one.
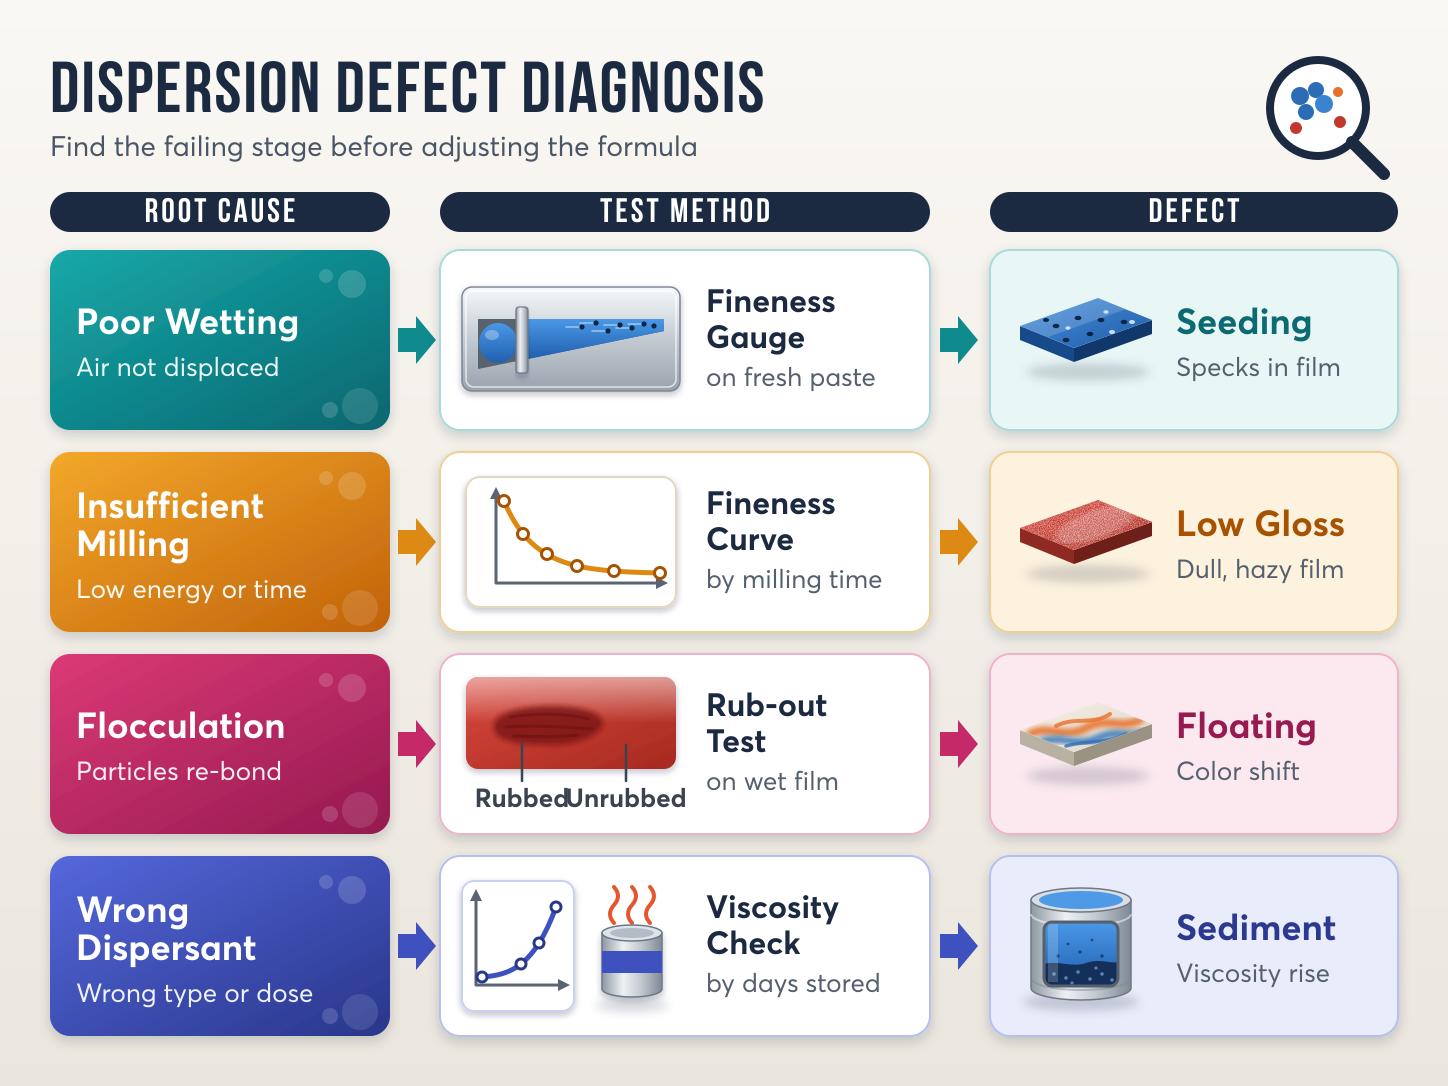
Cause 1 — Poor wetting (leads to specks on the film)
Signs: specks on the paint film, and air bubbles trapped in the powder mass of the paste.
Check: measure with a fineness gauge, commonly called a Hegman gauge. It is a steel plate with a groove that gets progressively shallower in one direction. Draw down a layer of paste along the groove with a scraper. The point where particles or streaks begin to appear shows the size of the largest particles remaining in the paste.
Fix: add the powder gradually to the liquid phase while stirring, and allow enough wet-out stirring time before moving to milling. Powder dumped in all at once forms dry lumps inside that the binder cannot penetrate.
Risk: extending milling time to make up for poor wetting heats the batch and wastes energy, while particles remain.
Cause 2 — Insufficient milling energy or time (leads to low gloss)
Signs: color strength and gloss are lower than the standard even though the formula has not changed.
Check: take samples at set milling times and track the fineness versus milling time curve. While the curve is still falling, energy is not yet sufficient. When the curve has flattened but the film is still low in gloss, the cause lies in another step.
Fix: adjust bead load, speed and millbase viscosity. A millbase that is too thin transmits shear poorly, and one that is too thick slows the beads and generates heat. Equipment selection and milling conditions are covered in the article how to choose a pigment milling method for industrial paint.
Risk: over-milling some pigments changes their shade, so the stopping point should be checked against the standard color.
Cause 3 — Poor stabilization, flocculated pigment (leads to color mismatch and floating)
Mechanism: separated particles stick together again in the liquid paint or while the film dries. In a system with several pigments, each one moves at a different rate depending on its size and how well the dispersant adsorbs on it. One pigment rises to the surface or separates into streaks, which is paint color floating. The same mechanism makes the dry color differ from the wet color, or differ between batches.
Check: the rub-out test. Rub a small area of the wet film with a finger, then compare the color of the rubbed area with the unrubbed area. A rubbed area that is darker or changes shade shows that clusters have been broken up, meaning the pigment has flocculated in the paint.
Fix: review the dispersant system and the order of adding colors, because a pigment added later can pull dispersant away from a pigment added earlier.
Risk: adjusting color by adding more pigment only hides the defect temporarily. The defect returns in the next batch, with higher pigment cost.
Cause 4 — Unsuitable or wrongly dosed dispersant (leads to settling and viscosity increase)
Signs: the paste thickens after a few days, and hard sediment forms at the bottom of the container in storage.
Check: measure viscosity by days of storage, and keep a sample container at a temperature higher than normal warehouse conditions. A viscosity that keeps rising, or sediment that cannot be stirred back in, shows that particles are re-aggregating.
Fix: choose a dispersant compatible with the resin system and the pigment type, and set the dose according to the pigment's surface area. A pigment with a large surface area needs more dispersant to cover its particles fully.
Risk: excess dispersant reduces the water resistance and adhesion of the film, so raising the dose is not a safe way to cure settling.
Quick diagnosis of pigment dispersion defects
When a paint batch has a defect, run the four steps below in order to narrow down the faulty step before changing the formula.
- Measure fineness right after milling. Use a fineness gauge on paste fresh from the mill. If coarse particles remain, go back to wetting and milling (causes 1 and 2).
- Run a rub-out test to detect flocculation. Rub out the wet film of the fully formulated paint. A rubbed area whose color differs from the unrubbed area shows that particles re-agglomerated after milling (cause 3).
- Compare color strength and gloss with the standard. Draw down a film of the same thickness as the standard and compare under the same lighting. If color strength or gloss is lower while fineness passes, suspect flocculation or the dispersant system.
- Track viscosity and settling after storage. Measure viscosity by days of storage and check the bottom of the container. Paste that thickens or settles hard points to a dispersant of the wrong type or dose (cause 4).
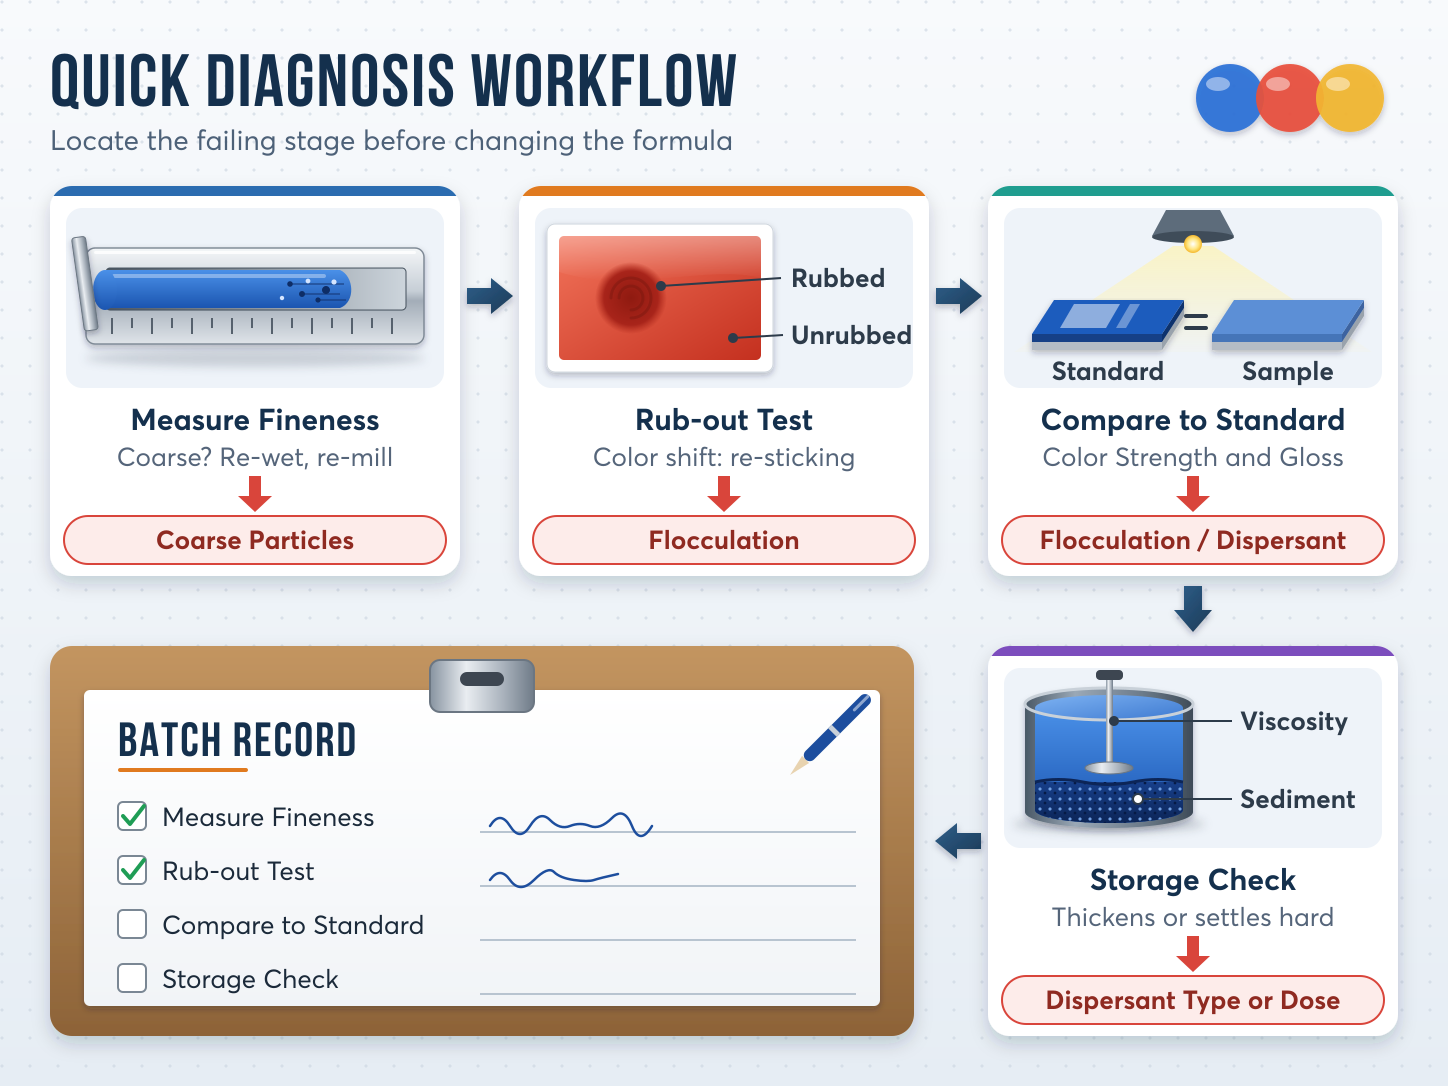
Record the result of each step in the batch record. When several batches show the same defect, the record shows which step the defect starts from and whether it repeats by pigment lot.
How to prevent pigment dispersion defects through material selection and operation
Prevention starts with fixing the process, then moves on to material selection.
Standardize operation. Document the order of addition, wet-out stirring time and milling parameters for each color system. When operators on different shifts follow the same record, dispersion is more consistent from batch to batch.
Choose the right pigment type. Organic and inorganic pigments differ in surface, hardness and compatibility with dispersants, so the same milling process does not give the same result. Hangzhou Zealan Chemical supplies organic and inorganic pigments for paint. When a line lacks milling capacity, pre-dispersed color paste removes the dry-powder milling step, and the plant only needs to formulate the color and check incoming fineness. If the line also makes packaging inks, read the article pigment or dye for packaging inks to choose the color type.
What to read on the TDS. Data are published for each individual grade, so check the exact grade in use:
- Oil absorption and surface area: determine how much binder and dispersant are needed to wet and fully cover the particles.
- Light fastness and heat resistance: show whether the color changes on outdoor exposure or in baking, and whether it withstands the heat generated during milling.
- Recommended resin systems: the resins and solvents the supplier has tested with the pigment.
Control between lots. Compare the COA of each lot with the approved lot, then make a trial and compare it with the color standard before production. A new lot with color deviation or poorer dispersibility is caught at this step instead of in the finished paint batch.
Frequently asked questions about pigment dispersion
How do I know the pigment is sufficiently dispersed?
Dispersion is sufficient when the gauge reading no longer changes across sampling points, the rub-out test shows no difference between rubbed and unrubbed areas, and the film reaches the color strength and gloss of the standard. All three tests are needed, because each one detects only one type of defect.
Why does paint show floating after it dries?
Floating occurs when the pigments in the same system move at different rates while the film dries, so one pigment rises to the surface or separates into streaks. The cause is usually flocculated particles or a dispersant that does not hold all the pigments evenly. The rub-out test helps confirm it.
Should I use color paste instead of dry pigment?
Consider it when the line lacks milling equipment or specks keep recurring despite process adjustments. Color paste removes the dry-powder milling step, but you need to check that the paste is compatible with the resin system in use and measure the incoming fineness of each lot.
Does longer milling always give better dispersion?
No. Once fineness is stable across sampling points, extra milling only generates heat and wastes electricity. With some pigments, over-milling also changes the shade. If particles remain, check wetting and the millbase before extending the time.
Conclusion
The five pigment dispersion defects, which are specks on the film, low gloss, color mismatch, floating, and settling or viscosity increase, can all be traced to four steps of the process. Diagnosing the right step before adjusting the formula helps the plant avoid treating symptoms by adding pigment or milling longer.
- The 5 pigment dispersion defects trace to 4 steps: wetting, milling, stabilization and dispersant.
- Fineness, the rub-out test and storage viscosity are the three main tests.
- Choose pigments according to the resin system and the plant's milling capacity.
Send photos of the paint film defect together with the resin system and milling parameters in use, and the Vichem technical team will review the cause with you.
Vichem is a distributor of chemical additives and equipment from leading brands such as Covestro, Sinopec, TotalEnergies Corbion, Bühler and Tinox in the Vietnamese market.
For more information about our products, please contact us through the following channels:
- Hotline: 08 1790 1790
- Zalo OA: Vichem JSC
- Email: contact@vichem.vn
- LinkedIn: Vichem JSC
- Website: www.vichem.vn
- Facebook: Vichem JSC