When you see incomplete UV cure, the film leaves the lamp still tacky to the touch or soft, and the cause is usually too little UV energy reaching the film or oxygen inhibiting the reaction at the surface. First determine whether the film is tacky at the surface or soft in the lower layer. Then check the lamp, conveyor speed, film thickness and how well the lamp matches the photoinitiator, the compound that absorbs UV to start the reaction.
Surface Tack and Through-Cure Failure Are Two Different Defects
Both defects give the same "not dry" feel to the touch, but their causes and remedies are opposite. Classify the defect correctly before you change any parameter on the line.
Surface tack: the layer below is already hard, and only the outermost layer is oily or sticky, leaving a fingerprint under light pressure. This is the typical sign of oxygen inhibition in the layer in contact with air. The film usually still adheres well to the substrate, so a scrape or peel test shows a firm layer underneath. The article on UV coating that stays tacky at the surface and how to fix it covers this defect in more depth.
Through-cure failure: the surface looks dry and feels tack-free, but the whole film is soft, slides when you rub it with a fingernail and adheres poorly to the substrate. The usual cause is UV that does not penetrate deeply enough, so the layer next to the substrate does not cure. A hard outer skin can form first and shield the remaining UV, so the defect only shows up during further processing or when the product is under load.
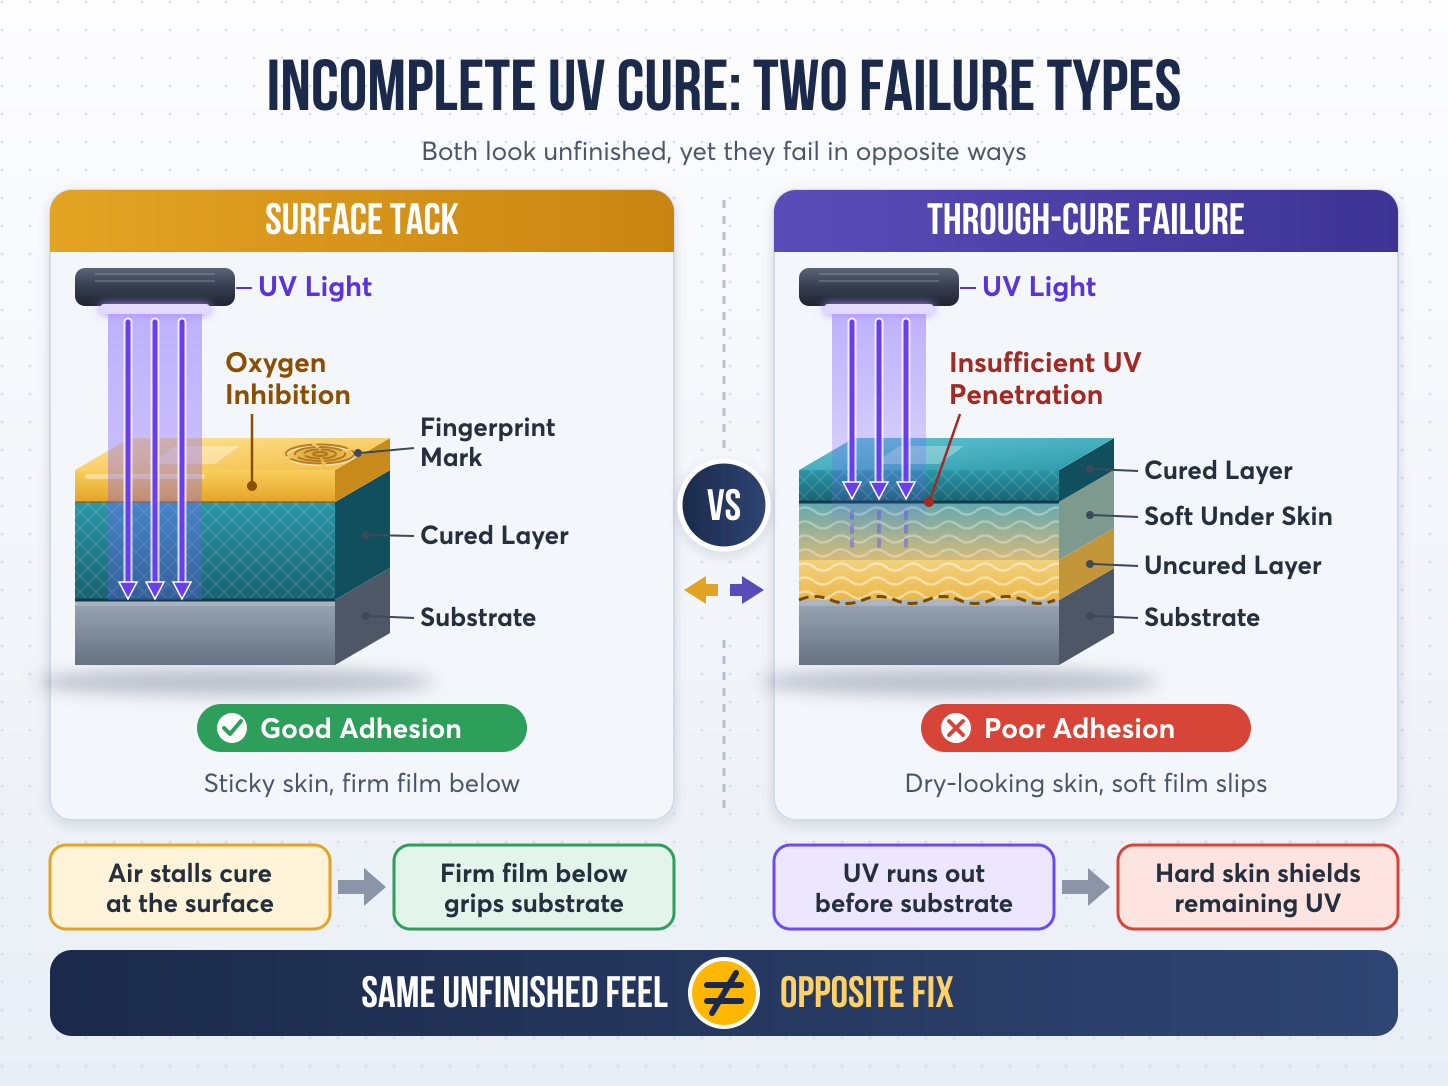
Consequences of treating the wrong defect: if the film is only tacky at the surface and you add a lot of energy to the whole film, you lose time and the film may be exposed to excessive heat. Conversely, if the lower layer is soft and you only treat the surface, nothing improves. Overcuring also makes the film brittle and prone to cracking when bent or hit. So the first step for the line engineer is to name the defect correctly.
Why Incomplete UV Cure Happens
UV curing is a chain of free-radical polymerization reactions, so anything that leaves too few free radicals or too little energy results in an unfinished film.
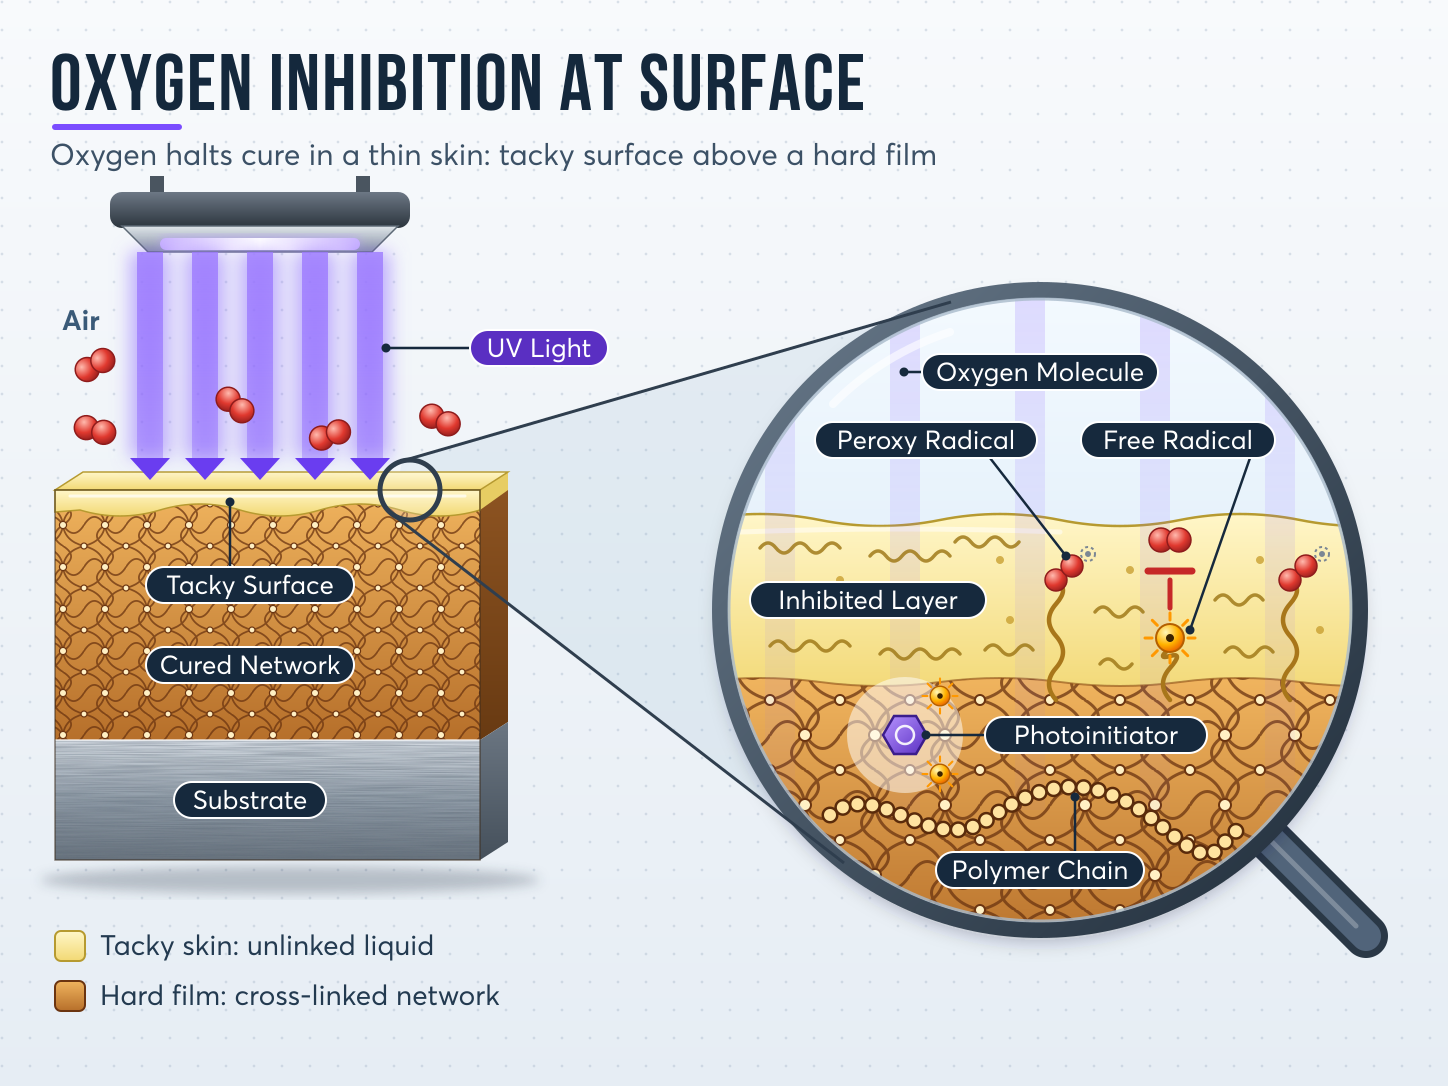
Curing mechanism: the photoinitiator absorbs UV and splits into free radicals. These radicals attack the reactive groups of the oligomers and monomers and start chain-growth polymerization, turning the liquid into a solid film. The reaction only takes place where enough photons are absorbed by the photoinitiator, so the lamp's intensity and spectrum determine the result.
Oxygen inhibition at the surface: oxygen in the air reacts with free radicals much faster than the chain-growth reaction does, forming low-reactivity peroxy radicals. The reaction stops in the thin layer next to the air, so you see a tacky surface even though the film below is hard. The thinner the film and the lower the intensity, the stronger the effect of oxygen.
Lamp and operating causes:
- The lamp's emission spectrum does not match the absorption range of the photoinitiator, so most of the energy passes through without generating free radicals.
- An aged lamp loses intensity even though it still looks normal to the eye, and a dirty reflector wastes more energy.
- A fast conveyor reduces the UV dose the film receives, because the exposure time is shorter.
Thick films, pigments and fillers: pigments, especially dark ones, and fillers absorb or scatter UV, so photons are held back in the upper layer. The thicker the film, the less energy reaches the layer next to the substrate. The result is a hard surface over a soft lower layer, exactly the through-cure failure described above. Titanium dioxide and some organic pigments have absorption ranges that overlap the working range of the photoinitiator, so white or dark formulations usually need separate consideration of the photoinitiator system.
These causes often add up: a slightly weak lamp, a slightly fast conveyor and a slightly thick film may each be too small to cause the defect on their own, but together the film does not cure fully.
How to Tell Whether Incomplete UV Cure Comes from the Lamp or the Formulation
You need evidence from the line itself before changing the formulation or replacing a lamp. Two simple tests, combined with reading the pattern of the defect, give a fairly clear direction for the investigation.
Solvent Rub and Tape Tests You Can Run Yourself
Solvent rub: wrap clean cotton or cloth around a finger, wet it with a solvent suited to the coating system and rub back and forth over a cooled film. A well-cured film keeps its surface. If the surface turns dull, becomes sticky again or picks up cotton, then surface cure is not adequate. Run the same test on several samples to compare between batches.
Tape test: apply adhesive tape to the film, press it down firmly and pull it off quickly. If the film comes off in pieces, this shows poor adhesion in the lower layer, possibly because the layer next to the substrate has not cured. If the film comes cleanly off the substrate but is hard, review the substrate and its surface preparation; this kind of defect is closer to poor adhesion of UV ink on plastic film than to a curing defect.
Signs That Separate a Lamp Fault from a Formulation Fault
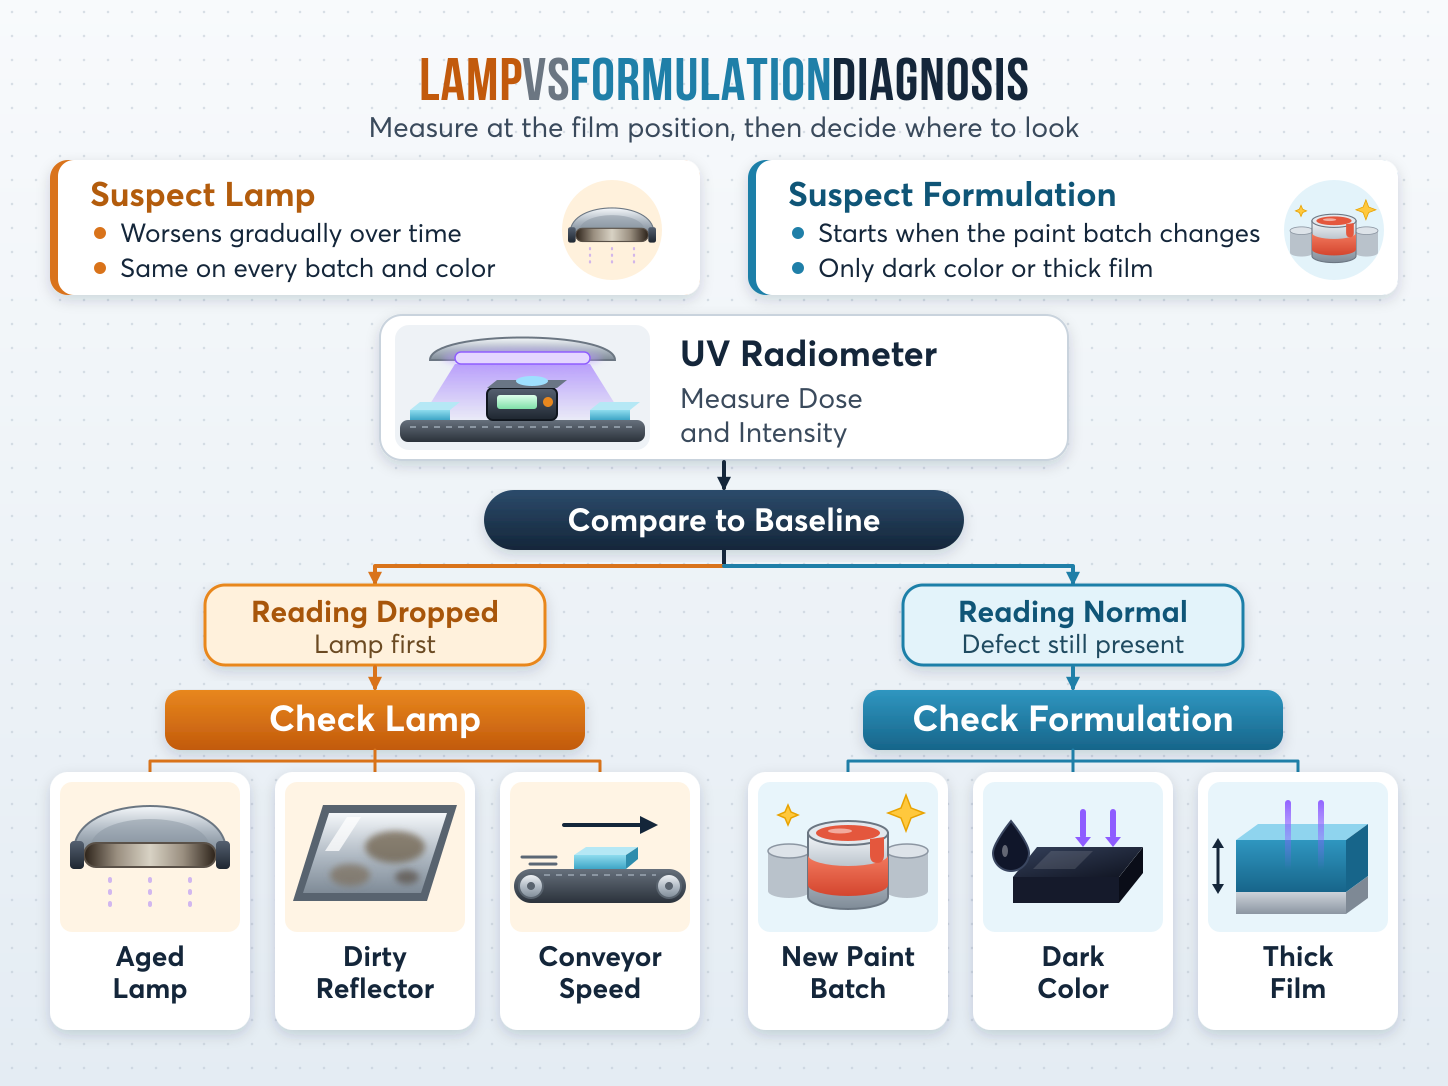
Suspect the lamp: the defect appears gradually over time, on every batch and every color, including coatings that used to run well. It is often worse on the side of a long-used lamp or in areas with a dirty reflector. Suspect the formulation: the defect starts when a new coating batch is introduced, or appears only in dark colors or thick films, while other products on the same line still pass.
To confirm, use a UV radiometer to measure dose and intensity at the position where the film passes, then compare with the values from when the line was running well. If the reading has dropped, deal with the lamp first. If the reading is normal and the defect remains, move on to the formulation.
How to Fix Incomplete UV Cure
Work in order: equipment and operation first, because they cost little and are easy to reverse, then the formulation once the readings confirm that the lamp is stable.
Equipment and Process Fixes
- Clean the reflector and check the protective glass of the UV curing lamp; dust and solvent vapor deposits reduce the energy reaching the film.
- Replace the lamp by running hours as recommended by the lamp supplier, and cross-check against radiometer readings rather than waiting until the lamp goes completely dim.
- Reduce conveyor speed to increase exposure time, then re-measure the dose at the product position.
- Adjust the lamp distance to the surface so that intensity is stable and uniform across the full width.
- Reduce the thickness of each layer, and apply several thin layers if you need a given total thickness, so that UV reaches the layer next to the substrate.
- For severe oxygen inhibition, consider an inert atmosphere in the exposure zone to remove oxygen from the surface; this is an equipment investment, so do it only after the steps above are not enough.
UV Formulation Fixes
When the lamp has been confirmed stable and the defect follows the batch or the color, review the resin system and the photoinitiator. UV-curable resins fall into two main groups: oligomers, which determine film properties, and monomers, which adjust viscosity and also take part in the reaction. Covestro supplies UV-curable oligomers and monomers for coatings, and choosing a type with suitable reactivity for your line's conveyor speed and film thickness is the first step. For interior wood coatings, you can also refer to the article on how to choose UV-curable resin for interior wood coatings.
On the TDS of each grade, read three items:
- Functionality, meaning the number of reactive groups per molecule: it affects cure speed, hardness and brittleness of the film.
- Viscosity: it determines how much monomer must be added, which in turn affects shrinkage and how strongly the system blocks UV.
- Application recommendation: it indicates whether the grade suits thin or thick films, and pigmented or clear systems.
The photoinitiator system must match the lamp type and film thickness. Thin films that suffer oxygen inhibition usually need a type that acts at the surface, while thick or pigmented films need a type that cures more deeply. Any change of resin or photoinitiator should be trialed on the actual line with the same lamp, speed and thickness in use, because lab results do not fully reflect production conditions.
FAQ on Incomplete UV Cure
Why is UV coating tacky to the touch after passing the lamp?
The most common cause is oxygen inhibiting the reaction in the outermost layer, so the surface does not fully cross-link even though the film below is hard. A weak lamp, a conveyor that is too fast or a film that is too thin makes it worse. Run a solvent rub test and measure UV intensity to find out where the shortfall is.
Does increasing UV lamp power always solve the problem?
Not always. Raising power only works when the cause is a lack of energy. If the lamp spectrum is off from the photoinitiator, or pigments block UV, the extra energy is not absorbed where it is needed and can also make the film brittle or overheated. Measure the dose first and cross-check against the formulation.
Are dark UV coatings harder to cure?
Yes. Dark pigments absorb or block UV, so the lower layer receives less energy than in a clear coating of the same thickness. Dark colors usually need a thinner film, a photoinitiator system chosen specifically for the pigment and careful trials on the line. White coatings containing titanium dioxide also fall into this difficult group.
How often should a UV curing lamp be replaced?
There is no single interval for every line. The lamp supplier gives recommended running hours for each lamp type, while actual life also depends on operating conditions and how clean the reflector is. The surest approach is to monitor intensity with a UV radiometer at regular intervals and replace the lamp when the reading drops compared with when the lamp was in good condition.
Conclusion
Incomplete UV cure can be handled systematically once you identify whether the defect is surface tack or a soft lower layer, measure the actual UV energy, and only then decide whether to fix the lamp or the formulation.
- Distinguish surface tack from through-cure failure before treating, because the two defects need different approaches.
- Measure the UV dose before changing the formulation; move to the formulation only when the lamp readings are stable.
- Match the lamp, film thickness and UV-curable resin system to the photoinitiator, then trial on the actual line.
Send us photos of the defect, lamp details and your line's running conditions so that the Vichem technical team can check the cause with you.
Vichem is a distributor of chemical additives and equipment from leading brands such as Covestro, Sinopec, TotalEnergies Corbion, Bühler and Tinox in the Vietnamese market.
For more information about our products, please contact us through the following channels:
- Hotline: 08 1790 1790
- Zalo OA: Vichem JSC
- Email: contact@vichem.vn
- LinkedIn: Vichem JSC
- Website: www.vichem.vn
- Facebook: Vichem JSC